Update your bookmarks... in my previous post I indicated a new EdTech change on the horizon - I'm headed back into the classroom and will be teaching Digital Learning and Digital Video Production in the fall! I'm super excited about the upcoming school year, and in an effort to create a one-stop-shop website that includes all of my classroom information and resources for students and parents, I've moved this blog over to my new teacher website at mrskarpiuk.com. All of my previous posts from this site have been moved there now, and I will no longer continue to update this Blogger site. All new and future posts will occur at mrskarpiuk.com/blog going forward.
Hope to see you at my new website! Thanks for reading and following, and don't forget to update your bookmarks.
Mrs. Karpiuk, aka @IHeartEdTech

Sunday, July 6, 2014

Wednesday, May 28, 2014
A New EdTech Adventure

Though I was on leave, I still lurked on the #edtech and #edchat Twitter hashtags and pinned a bunch of things to save and address upon my return. And now that I've returned, a new edtech adventure is on the horizon for me; I will be teaching Digital Learning as well as Digital Video Production next school year at one of our middle schools. Though the instructional technology coaching position is going away, I am excited about the new challenges and getting to put a lot of the resources and ideas I've curated over the past four years to use in a classroom with students. Before I was an instructional technology coach I taught Computer Applications at the middle school level, so being a secondary tech teacher is familiar and something I truly enjoyed and am happy to get the opportunity to do again. Just THINK of all of the things I've learned in my current position that I now get to apply in a classroom!
It will probably be quiet again around here this summer as I enjoy time with my new baby and almost three-year-old son and start planning for next school year, but I'm looking forward to the direction this blog will go in August as I begin implementing the new digital learning curriculum. I hope to continue to share great edtech ideas for teachers, but I'll also be able to share projects that we're actually doing in class and what went well or didn't go so well. Thanks for joining me on this new adventure, and see you next school year!
Tuesday, February 4, 2014
Creative Commons Search: Find Content You Can Share, Use and Remix
 |
| Image from CreativeCommons.org |
Here's where Creative Commons comes in. Authors can choose to publish their work under a Creative Commons license to adjust copyright stipulations, which may allow the work to be shared, used, or remixed by others. From the Creative Commons website:
What is Creative Commons?
- Creative Commons is a nonprofit organization that enables the sharing and use of creativity and knowledge through free legal tools.
- Our free, easy-to-use copyright licenses provide a simple, standardized way to give the public permission to share and use your creative work — on conditions of your choice. CC licenses let you easily change your copyright terms from the default of “all rights reserved” to “some rights reserved.”
- Creative Commons licenses are not an alternative to copyright. They work alongside copyright and enable you to modify your copyright terms to best suit your needs.
Okay, so it's good to know that some people may have images out there available for you to adapt or use in education, but how do you search among images (or other works) that fall under Creative Commons in your classroom?

The CC website has a CreativeCommons.org search feature. It links to other sites' Creative Commons search services like Flickr, Google Images, and YouTube. It's a convenient way to let you search all of those other services in one place right from the CreativeCommons website instead of going to all of these places independently and doing the same search ten times. There is a disclaimer, however:
Please note that search.creativecommons.org is not a search engine, but rather offers convenient access to search services provided by other independent organizations. CC has no control over the results that are returned. Do not assume that the results displayed in this search portal are under a CC license. You should always verify that the work is actually under a CC license by following the link. Since there is no registration to use a CC license, CC has no way to determine what has and hasn't been placed under the terms of a CC license. If you are in doubt you should contact the copyright holder directly, or try to contact the site where you found the content.
Just remember to always verify the results that are returned when you search at CreativeCommons to ensure that the CC license for the work allows you to use it in the way you want to use it. (Or that it really is licensed under CC!) But this is a good starting point to find potential images that can be used safely and legally in education, and still encourages students to check ownership and correctly attribute works that they find online. It teaches the importance of not just running out and grabbing any image on Google Image search and looking closely at licenses and respecting ownership for copyrighted works.
Want to learn more about CreativeCommons? Check out their About page for a video explanation, information, and the history behind the CC movement.You can also find out how YOU can publish under a CreativeCommons license as well!
Thursday, January 23, 2014
Quickly Accessing Resources in a BYOD Classroom

The first day of bringing in devices can be a little bumpy and seem a little time consuming, but that's usually just because it's the first time students have connected to the district's wireless network and they may need help (especially in the primary grades) with this step. The good news is that going forward, their device will remember and auto-connect to the school's wireless the next time they bring it to class, so this is usually only a bump on day one that you don't have to take time to address every time.
The other piece to make BYOD successful in the classroom is quick and easy access to the resources students need for the lesson. Every second of instructional time is important, and you don't want students to waste time fumbling to find a variety of sources all over the Internet. To make it more streamlined for kids, I recommend putting together a BYOD page on your classroom website with all of the curated resources they'll need for the day in one place. Chances are, your students are well versed in getting to your classroom website, and because you can edit your BYOD resources page any time, you can edit it ahead of a lesson to make the links relevant for the day on the fly. (And house commonly used resources you want kids to have quick access to!)
But even with our students well versed in finding their teacher's classroom website, there's still the steps of going out to the web browser, searching for their school, then browsing the school website with a few clicks to finally get to your classroom webpage. So to make this one step simpler for kids, take the time to teach them how to set a bookmark directly to your BYOD resource page of your website.
Adding a bookmark in your device's browser (or directly on the "desktop" of the device, which is even faster!) will vary depending on the device you're using, but the process is fairly similar. In our district I see mostly iOS devices, with Kindles coming in second and Android coming in third... so my instructions will focus on these three devices. And depending on whether it's a phone or tablet or which model, the instructions may vary a tiny bit. Don't forget you can Google or YouTube to find specific instructions to help add a bookmark to your device's "desktop" if the below doesn't help. I promise that someone out there has documented what you need already!
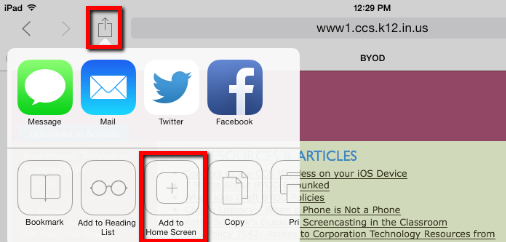 1. Go to the specific webpage you wish to bookmark in your Safari browser.
2. Click the up arrow icon next to the address bar.
3. Select the Add to Home Screen option. This will place an icon on the desktop for students amongst their app icons. (They have the option to modify its name.) It can be moved around and organized on the home screen like any other app. So simple!

1. Go to the specific webpage you wish to bookmark in your Silk browser.
2. Tap the Menu icon at the bottom of the screen and select Add Bookmark. You can modify the name of the bookmark, then tap OK to save it.
3. To access bookmarks quickly later, tap the bookmark icon at the bottom of the Silk browser screen, and bookmarks will appear for the student to choose from.
Note: The Silk browser remembers sites you access frequently, so eventually your BYOD resource website may show up on the browser's opening screen.
Android
1. Go to the specific webpage you wish to bookmark in your Chrome Android browser.
2. Tap the menu button and (depending on the browser) press the star icon to add a bookmark, or select Add to Bookmarks to do so. You can modify the name of the bookmark. Press Add.

3. The bookmark is now saved in your browser. To access your bookmarks, just press the menu button again and tap Bookmarks. When you see the bookmark listed, tap and hold the bookmark a bit to bring up an additional menu - then select Add Shortcut to Home.

I admit it will take a little time that first day or the first time you tackle helping your students bookmark your page - the first time is always that way because it may be a new process and kids may have different devices and instructions. Trust that they can help each other, too. And just think... once they've bookmarked your resources page, they will be able to access the sites they need with one or two taps in the future. In the long run this will save you so much time and totally streamline your use of devices in the classroom. It will be worth it!
Tuesday, December 17, 2013
Drop Everything and go check out Blendspace
Blendspace is a free web tool for teachers to collect resources in one place to form a bundled, interactive lesson for students or colleagues. When you create a Blendspace lesson, you can pull in videos from YouTube, websites, pictures, EduCreations lessons (check out my previous post about EduCreations for more info on that!) Flickr images, or links and images from Google. You can import from Gooru, OpenEd, Dropbox, or Google Drive. AND you can always upload your own files, like PowerPoints or resources housed on your own computer. Pretty much any resource you can imagine or that you would pull together to share can be embedded into a Blendspace lesson. But that's not all! (Note: video above is a quick overview!)


Another perk of students having a Blendspace account is that students can then create Blendspace "lessons" of their own. How cool would it be for students to use Blendspace to share what they've learned as a final project instead of a boring old poster or written report? Talk about authentic assessment! Let students curate and create resources to teach a topic or show their learning in a more more meaningful and engaging way with you and their peers.
I can also see myself making Blendspace lessons for fellow colleagues for professional development purposes. Just yesterday I shared a quick Blendspace I put together of resources for creating and using QR codes in the classroom for a fellow teacher who was interested in learning more about how he could use QR codes in his math class. It was a great way to play with Blendspace AND share both Blendspace as a resource and all of my QR code resources with this teacher. I've already received an email from him this morning that he's jumping right in with Blendspace AND QR codes. Hooray!


Blendspace helps you truly blend your classroom. Collect and organize resources in one place and share them with a single link. Measure student understanding with built-in quizzes along the way, and track student progress in a way that lets you be responsive to every student's needs. Best of all, Blendspace lessons are available anywhere with a browser! This supports our BYOD model, and means that students can access your content anytime, anywhere with internet access, no matter what kind of device they're using. It just doesn't get much better than that.
Thursday, December 12, 2013
LearnZillion Can Help Keep Students on Track Over Winter Break
 |
| LearnZillion.com |
I got an email from LearnZillion this week with some tips and tricks on how its service can help keep kids on track during the holiday break, and the ideas are too good not to share again, especially with the upcoming break almost upon us.
First, if you're not already using the Assign function in LearnZillion to assign video lessons to your students, I highly recommend doing so! It only takes a few minutes to add your classes/students. Then you can assign targeted video lessons to specific students based on their individual needs, whether they need reinforcement or a challenge on a particular concept. If you want to see how quickly you can add students (really!), check out my LearnZillion Video Tour starting around the 2:13 mark. Then watch this quick tutorial on assigning lessons from LearnZillion.
Prevent Winter Break Brain Drain!
Tips and tricks from LearnZillion
ELA: Assign one fiction and one non-fiction reading set for winter break, or create a list of possible reading lesson sets with a minimum of one from each genre so students can choose. Always give students the option to do more if they want!
Math: Let students preview what's coming in the new year by assigning lesson sets for standards you'll be teaching in January. If a student needs targeted help, assign him or her a lesson or lesson set from the standard they're working toward.
While students may be sliding down snow-covered hills over winter break, at least you'll be confident knowing they won't also be sliding in reading and math, thanks to these tips straight from LearnZillion.com.
Looking for more ideas on how to use this tool effectively? I love the LearnZillion Blog, where the Dream Team posts tips and tricks like these all the time. For example, the most recent post, Three Tips for Approaching Close Reading, is excellent!
Happy holidays! See you in 2014.
Tuesday, December 10, 2013
Padlet in the Classroom

Padlet.com is a free web 2.0 tool for teachers. With an account, a teacher can create unlimited shared wall spaces that are great for collaboration between students or colleagues. Create a wall and share it with students; they don't need to have an account to collaborate on the wall.
When you make a Padlet wall, you as the owner have control over how it looks and functions. Set the background, give it a title and description (the perfect space for instructions) and even give it a personalized URL. All walls have their own unique URL, which is how you share it with others.You can even password protect your wall, so you'll be confident linking to your collaborative wall on your classroom webpage for students; just be sure they know the password to access the wall. And because it's web-based, this means it can be accessed from anywhere with internet access. (A great tool for flipped classroom setups.)

To add to the wall, simply double click (or double tap, as it works perfectly in the browser of any personal device, too!) and you'll create a new post-it note. You're able to add a heading or title to your note (a great place for students to type their names to help distinguish and identify their notes from others) and text in the body of the note. Notes are re-sizable and the owner of a note can move it around on the wall. The best part? You're not limited to just text on a note; you can also attach other things to your notes: add a URL to other websites or videos, upload a file (hello, assignment turn-in!) or take a photo using your computer's webcam.

I love using Padlet for exit slips. For example, I presented BYOD to our secondary admin at a meeting. At the end, I directed them to a Padlet wall I had created where I wanted them to add a note and tell me what kind of support they wanted for their building, so that I knew how to follow up with them and set up future trainings. Of course, with the nature of posting "notes" to a wall, the notes were all over the wall in no particular order by the end. This is the beauty of Padlet - I collected the data from "students" and then as the owner of the wall, I can go back to it later and rearrange the notes in a meaningful way for ME so that I can analyze the data. I arranged the notes by building so that I could see what each building's needs were, and then I added a note myself underneath each building's cluster of notes to remind myself how and when I contacted those admin to arrange the follow up supports they wanted. Even 3 months later, I can go back and tell you on what date and how I followed up with those administrators.
For a practical classroom example, let's say you asked your kindergarten class to add a post-it to your wall with a word that has a long "A" sound in it. Whether students are 1:1, BYOD, or you have a "station" with the wall up on a classroom computer and students rotate through and add a post-it sometime during the day, at the end of the day YOU have a wall of notes, one per student, and now you can arrange the notes in a meaningful way to analyze who gets it and who doesn't. Over here are all the kids who got it, over here are all the ones who didn't. Now you know who needs more work with the long "A" sound. Change up the question depending on the topic, grade level, etc.

This tool isn't just for students: you can use Padlet to collaborate with your colleagues or collect resources and images for an upcoming project with your department or grade level team all in one place together.
I worked with a secondary art teacher who wanted to take her class on a walking field trip through the building with their devices. Students were to use their device to take pictures of various elements of art that they had been learning about - texture, space, line, etc. Her dilemma was then how to have all of those images shared back with her so she knew if they understood the concepts or not. Solution? She created a Padlet wall and shared it with the class. When students were done with the activity, they were able to access the wall right in the browser of their devices, and using the Upload File option, attach pictures right from their camera rolls onto their post-it. So Joe adds a note with his name on it and types, "This is my example of texture" and attaches the picture he took representing texture to the note. Bam. All students do it, and now all students can see each others' photos and more importantly, the teacher can tell who gets it and who doesn't. Or perhaps students can analyze the results and weigh in on whether or not they make sense. All in one place.

Padlet is great for "parking lot" or "check in to check out" activities. Imagine a gym class where the teacher asks students to share how they beat their personal best this week, or a music class where students add a post-it to the wall to share what imagery came to mind as they listened to a specific piece of music.
Students can cite evidence from text in a close reading activity using a Padlet wall. I worked with a teacher who asked students whether they had free speech or not. After accessing various articles on what free speech is, students were then asked to support their opinion on the Padlet wall, citing evidence from the text that they read. This kind of activity spans all grade levels; citing evidence and supporting your opinion is a key skill at any age.

What about a KWL chart? By using a different background on your Padlet wall, (or uploading your own) and adding headings yourself ahead of time to define the K-W-L spaces on the wall, students can then add post-its and place them under the proper category to share what they Know, what they Want to know, or what they Learned. And speaking of using Padlet to categorize notes, you could also use it as a space to collaborate on a schedule or have students organize their responses in a certain way. It's important to note that the teacher is the only one with a Padlet account; and the owner of the account/wall is the only one who has control to move ALL of the notes around. Students connected to the wall can only modify, edit, or move THEIR own notes around, but not the notes put up by others. Keeping Padlet's Terms of Use in mind, accounts can only be created by those 13 and older, so in the elementary realm this would be the teacher only, but secondary students could make their own Padlet accounts and set up their own walls so that they have a collaborative space to work with peers on group projects. (To achieve a collaborative space for group projects in the elementary, the teacher could make all of the walls and share the different wall URLs with teammates.) Speaking of TOU, don't forget that teachers of students under 13 should notify parents and seek permission for students to use the service to post notes on your wall(s) before continuing. You can access that information here: Padlet's Terms of Service

Here's another cool idea - you as the teacher set up a wall and link to a video news article online. Your instructions are for students to watch the video, and then post a note in response to the video on the wall. What I love is that you achieve this by inserting the URL to a YouTube video, for example, and students can watch the video embedded right on the wall instead of clicking off to another page or window. Then they can post their response right away, next to the video clip. This also works by linking to a specific news article or website; students access the link to the article or website and read it, then come back to the wall and post in response to a question you pose about what they read.

Another unique way to use a Padlet wall is as a communication tool for parents and students on your classroom webpage. Think of it as a forum; set up your Padlet wall so that notes post in a column layout, (this means anytime someone adds a post-it note, it goes in a column stream on the wall instead of anywhere randomly on the page) and you'll be able to see the latest notes posted at the bottom. Students could post a note ask for homework help, and anyone from class - you or another classmate - can add a note to respond and help. You can also share information with parents by posting a note, and attach any relevant files, images, or URLs they may need. This turns the Padlet wall into a stream of interactive conversation. If you password protect your wall, it only becomes accessible to your students and parents. (Just don't forget to share the password with them!)

Whew! There are tons of ways that Padlet could be used effectively in the educational space, and the list keeps growing. Padlet even has a gallery of ways people use it that you can check out. How would YOU use Padlet in the classroom? Contribute your ideas to this public Padlet wall!
Thursday, December 5, 2013
My Biggest EdTech Pet Peeve

I follow a lot of edtech bloggers, magazines, and online new sources, and attend a handful edtech conferences both physically and virtually each year. One trend that I keep seeing over and over again in all of these professional places is my biggest edtech pet peeve: those who recommend online tools and services for use with students without looking at or knowing about the site's Terms of Use (TOU) and whether a site complies with federal guidelines or can even be used with students at all. A lot of times I hear a presenter speak about a cool new web tool and have examples of how an elementary classroom used it, completely ignoring that xyz service explicitly states that children under 13 cannot use it. I don't feel like that models best practices very well, and now an entire room of other educators run off to use xyz with their students without even a thought to Terms of Use.
I know it sounds like a small thing, but I am shocked at how often professionals I follow, or those who present at big educational conferences on behalf of a professional organization, blatantly ignore TOU and requirements under the U.S. federal law called COPPA - the Children's Online Privacy Protection Act. It makes me crazy to see sites that have GREAT educational services and tools for kids and who advertise themselves to teachers and the education space and yet their TOU are not friendly for kids under 13. And let's face it - "children under 13" applies to a whole lot of kids in the K-12 world. I love the enthusiasm of a tech savvy teacher or colleague who finds a neat site and wants to dive right in with their students... but cringe when they've started using the site with kids under 13 without being aware of the site's legal requirements (and their requirements) when being used with students first.
In a nutshell, COPPA is a United States federal law that protects the confidentiality, security, and privacy of children under the age of 13 online. Commercial websites and online services directed at children (i.e. all educational web 2.0 tools!) are not allowed to collect personally identifiable information from children under 13 without disclosing their privacy policy to parents and obtaining parental consent to do so. And while this is a United States federal law, its jurisdiction applies to foreign websites that are directed or accessible by U.S. children as well.
COPPA originally went into effect in April of 2000, but a new update that went into effect this year - on July 1, 2013 - has further stipulations on website owners and includes additional requirements for parental notice and consent, and some of the amended obligations are even more strict than they were previously.
While the exact verbiage of a site's full Terms of Use can vary from site to site, the basics (have to be) the same at the bare minimum with COPPA compliance in mind. (And just because a site doesn't comply with COPPA doesn't make it okay, either!) Some sites do a better job than others outlining exactly what those under 13 who want to use their services must do, and sometimes it's harder to find the verbiage as it may not be addressed specifically in the TOU, but instead on the site's Privacy Policy page. Or instead of stating anything about COPPA or "13 and under" explicitly, some sites will more vaguely blanket statement that you must be of legal age to form a binding contract or that the service is not for someone "barred from receiving services under the laws of the United States or other applicable jurisdiction." Yes, it can be tricky! Beware that some sites don't want to deal with the red tape that goes along with complying and proving compliance with COPPA, so they don't allow children under 13 to use their services under any circumstances just to avoid the whole situation. You may need to look at both the site's Terms as well as Privacy Policy to get the full scoop.
(One example is Twitter. See how in their TOU they use a generic blanket statement but then address children specifically in their own section of Twitter's Privacy Policy? By the way, children under 13 cannot sign up or use Twitter services. Period.)
 | |||
| Excerpt from Twitter's TOU |
 |
| Excerpt from Twitter's Privacy Policy |
So now you're thinking... WHAT DO I DO?!
Think of it this way: if an online site, service, or tool has a sign-up requirement, children 13 and under can't use it, or at least won't be able to use it right out of the box. You'll have to see if it's allowed at all under the site's terms, or if there's a way to use it if you seek parental notice and collect consent prior to use. A red flag is the requirement of an email address during the registration process, since an email address is an indicator that personal information will be collected. And just because a site doesn't ask for an email address during sign-up doesn't mean it's automatically okay for children under 13, though, either... you still always have to look at the Terms. Even if you teach kids over 13, many sites still require all minors (18 and under) to obtain parental consent before use. It all depends on how much red tape the website operator wants to deal with and be responsible for, so your mileage may vary.
Bottom line? There's a federal law in place for children under 13, which will affect whether those students can use certain sites and services or not. Always read the Terms of Use for every site and service you want to use with kids first. Chances are it will be possible, but will require some leg work ahead of time to ensure the privacy and safety of your students. But it also may not be possible at all. (Like in Twitter's case, as an example.) Remember that even in situations where you are setting up the accounts for your students - most services still have stipulations due to COPPA that involves you notifying parents of the terms and privacy policy and collecting their consent first, as your account is responsible for student accounts complying, and by signing up, you imply that you've already sought parent consent. (So you want to make sure you actually have!)
The excuse that technology moves so fast that we as educators don't have time to check the TOU of every single site or service just doesn't cut it anymore. Especially when you teach the younger crowd that is directly affected by this federal law. It has always been a teacher's professional responsibility to keep kids safe, we all know that. Before the digital shift, this seemed very black and white, but since most classrooms have some kind of online component or access these days, that responsibility has to extend to the online space as well. With a new frontier comes new rules and practices and it sure feels like a whole lot of grey area right now. The best we can do is educate ourselves and try our best to keep up with the rapidly moving pace of technology AND keep kids safe at the same time.
Monday, November 25, 2013
Using PollEverywhere.com for Formative Assessment

For example, if I'm holding a training session on Google Docs, I may have a poll up as people are arriving to ask them their comfort level with Google Docs at that moment, before the training. I can look at the results quickly before I start and tune my training accordingly based on the data; if most people have zero experience with Google Docs, I would teach differently than I would if I had a large group of people with experience. And if I have some that identify as intermediate or expert, I have some more challenging "take it to the next level" activities in my back pocket for them. Though this data is anonymous and depicts the group as a whole, it still helps me differentiate and support the full spectrum of needs thanks to a quick poll with instant, live results I can use right away.
PollEverywhere is a great formative assessment tool.You can sign up for a free account at PollEverywhere.com. There is the option to upgrade to a paid, premium account (which gives you the ability to enable student registration and grading), but I'm happy with the capabilities of the free account for my needs. Remember - I am just looking for quick, instant feedback to help drive my next lesson or gauge my audience on the fly.
There are two types of questions that you can create: multiple choice or open-ended.
Multiple Choice Poll Questions


 |
| Analyzing results: Before (left) and After (right) |
Open-Ended Poll Questions


PollEverywhere.com is a web-based tool that can be used to support BYOD (Bring Your Own Device) models or 1:1. You're not limited to just texting in a response to a poll, though that is certainly an option I've used with adults before, but responders can use the web response form (located at http://pollev.com) in the browser of any device - laptop, smartphone, tablet, desktop computer, etc. - to answer poll questions. In the free speech example above, students in the classroom had a combination of laptops they borrowed from the school and their own devices that they brought in. I LOVE browser based tools that support technology integration regardless of tech model. If you have a limited number of devices to use, you can always have students group up and collaborate on the question, coming to a consensus and then voting as a group. You could also use the device as a "station" - by refreshing the web response page at pollev.com after submitting your response, you're free to submit another response. So one student could respond, hit refresh, and another student could then respond as well.

The possibilities seem endless, and it's such a quick way to gather informal data that you can turn around and act upon immediately. Head on over to PollEverywhere.com and make an account today!
Thursday, September 12, 2013
Explain Everything!
If you enjoyed my last post about EduCreations, a great free whiteboard app for iOS that lets you record whiteboard lessons that you can share with students, then you'll really love Explain Everything. Especially if you flip your classroom or are experimenting with the idea of flipping some lessons.
Explain Everything 2.0 from MorrisCooke on Vimeo.
Like EduCreations, Explain Everything is a whiteboard app. Use it to record yourself teaching a whiteboard lesson. Draw, write, annotate, and narrate your way through tough concepts and share your recorded lesson with students. These recordings are great for students who missed a day of class, who need remediation or a memory refresher before a big test to reinforce big class concepts.
I explained all of this as part of my EduCreations post, though. So how is Explain Everything different and why am I spending time with it? Explain Everything is the next level of whiteboard lesson creation. Don't get me wrong - I love EduCreations. It's simple, free, and sometimes that's all you need. However, I found myself wishing I could embed video clips, pull websites into my whiteboard lessons, or go back and edit parts of my previous recording and this wasn't possible... until I discovered Explain Everything.
With Explain Everything, your basic functionality is there, of course - different pen colors for annotating, the ability to record yourself as you work through as many slides as you need to teach a concept, inputting text from your device's keyboard, pulling in images, etc. But Explain Everything lets me pull images, VIDEOS and FILES from Dropbox, Google Drive (which is great for our teachers, who all have Google Apps for Edu) Evernote, WebDAV, iTunes, box, or your camera roll. You can even pull in a webpage - type in the web address and the site appears, so you can record yourself going through actions on a website, or even annotate on the website. Super slick!
A few other little added features to Explain Everything that are nice to have when you're recording a whiteboard lesson include the insert shapes feature. There are only a couple of shapes - an arrow, a star, a line, a circle, and a square - but having those to draw attention to key pieces of your lesson are handy. Speaking of drawing attention to something, I also love the various cursor types available. When recording a whiteboard lesson, your gestures aren't always obvious, so having a laser pointer cursor or even the recognizable hand or arrow icon used on most computer operating systems to help you point something out is useful.
One really great feature of Explain Everything is the ability to go back and edit your recorded lesson's timeline. It's simplistic, but so helpful. Say you just messed up part of your recording. Pause the recording, press the Timeline Scrubber to go into playback mode, and go back to a point in your recording before your mistake. Then just press the Record button and you can record over and replace the existing recording piece where you messed up. This was something I really wanted from EduCreations, so I'm glad to see it in Explain Everything.
Once your whiteboard lesson, with all of its added bells and whistles, is finished, it's time to share with students. Just like you have a wide variety of choices when pulling in media to your lesson, you can also share your finished lesson in several ways. You can save it as an image, or as a video file for playback by students later. Save it to your camera roll, upload the movie to YouTube, Dropbox, Evernote, Vimeo, or Google Drive. Our teachers have access to a YouTube account through our Apps for Education Google accounts, which includes Google Drive. If uploaded to YouTube or Google Drive, teachers then have access to a URL to their video they can share with students, or they can Share in Google Drive with just the specific people that need to see the video lesson.
A few technical notes - Explain Everything isn't free, but its $2.99 price tag isn't bad, either. Definitely worth it for the added features it has over EduCreations if you need or like the extra bells and whistles that Explain Everything provides. Both EduCreations and Explain Everything are currently iOS only, HOWEVER, much to my excitement, Explain Everything is also available for Android, too. This will make my BYOD teachers that have Android devices very happy!
The possibilities seem almost endless with Explain Everything, and I definitely think it's a fabulous tool. Check it out!
Like EduCreations, Explain Everything is a whiteboard app. Use it to record yourself teaching a whiteboard lesson. Draw, write, annotate, and narrate your way through tough concepts and share your recorded lesson with students. These recordings are great for students who missed a day of class, who need remediation or a memory refresher before a big test to reinforce big class concepts.
I explained all of this as part of my EduCreations post, though. So how is Explain Everything different and why am I spending time with it? Explain Everything is the next level of whiteboard lesson creation. Don't get me wrong - I love EduCreations. It's simple, free, and sometimes that's all you need. However, I found myself wishing I could embed video clips, pull websites into my whiteboard lessons, or go back and edit parts of my previous recording and this wasn't possible... until I discovered Explain Everything.
With Explain Everything, your basic functionality is there, of course - different pen colors for annotating, the ability to record yourself as you work through as many slides as you need to teach a concept, inputting text from your device's keyboard, pulling in images, etc. But Explain Everything lets me pull images, VIDEOS and FILES from Dropbox, Google Drive (which is great for our teachers, who all have Google Apps for Edu) Evernote, WebDAV, iTunes, box, or your camera roll. You can even pull in a webpage - type in the web address and the site appears, so you can record yourself going through actions on a website, or even annotate on the website. Super slick!
A few other little added features to Explain Everything that are nice to have when you're recording a whiteboard lesson include the insert shapes feature. There are only a couple of shapes - an arrow, a star, a line, a circle, and a square - but having those to draw attention to key pieces of your lesson are handy. Speaking of drawing attention to something, I also love the various cursor types available. When recording a whiteboard lesson, your gestures aren't always obvious, so having a laser pointer cursor or even the recognizable hand or arrow icon used on most computer operating systems to help you point something out is useful.
One really great feature of Explain Everything is the ability to go back and edit your recorded lesson's timeline. It's simplistic, but so helpful. Say you just messed up part of your recording. Pause the recording, press the Timeline Scrubber to go into playback mode, and go back to a point in your recording before your mistake. Then just press the Record button and you can record over and replace the existing recording piece where you messed up. This was something I really wanted from EduCreations, so I'm glad to see it in Explain Everything.
Once your whiteboard lesson, with all of its added bells and whistles, is finished, it's time to share with students. Just like you have a wide variety of choices when pulling in media to your lesson, you can also share your finished lesson in several ways. You can save it as an image, or as a video file for playback by students later. Save it to your camera roll, upload the movie to YouTube, Dropbox, Evernote, Vimeo, or Google Drive. Our teachers have access to a YouTube account through our Apps for Education Google accounts, which includes Google Drive. If uploaded to YouTube or Google Drive, teachers then have access to a URL to their video they can share with students, or they can Share in Google Drive with just the specific people that need to see the video lesson.
A few technical notes - Explain Everything isn't free, but its $2.99 price tag isn't bad, either. Definitely worth it for the added features it has over EduCreations if you need or like the extra bells and whistles that Explain Everything provides. Both EduCreations and Explain Everything are currently iOS only, HOWEVER, much to my excitement, Explain Everything is also available for Android, too. This will make my BYOD teachers that have Android devices very happy!
The possibilities seem almost endless with Explain Everything, and I definitely think it's a fabulous tool. Check it out!
Tuesday, September 10, 2013
Flipping Your Classroom with EduCreations
 |
| Screenshot from the web version of the tool. Don't mind my poor handwriting with a mouse! |
There's no one right way to flip, and flipping can look different from classroom to classroom. Some teachers post video lessons they curate from other sources, while some record their own. (Check out Kathy Schrock's awesome guide and resources for screencasting!) There are 100% flipped classrooms where EVERY LESSON is online, but most teachers I work with who are flipping are just doing so some of the time, for very specific lessons or student needs. For example, one teacher I know will do quick recap videos of big science topics (i.e. the water cycle) and make it available for students who missed class or who want to use the video to help them study for the upcoming test.
Whether you plan to truly flip lessons or just make content available to students online for remediation, one tool that I really enjoy is EduCreations. EduCreations is a whiteboard web tool and app that allows you to record whiteboard lessons and share with students. It's also 100% free!
 |
| Create a lesson via the web or create on the iOS app. Lessons created on the app will appear on the web dashboard, too. |
 |
| Share options on your finished lessons. |
Here is a quick demo "lesson" I made of EduCreations' tools and features that I have embedded into my blog:
On my "wish list" for EduCreations is a way to go back in and edit the whiteboard video or narration if you make mistakes. A lot of times you're probably just recording small snippets of concepts, but if you're recording a long lesson and mess up, you pretty much have to start over. Also, unless you're REALLY good with your handwriting using a mouse, or you have a digital pen/tablet set up on your computer, you'll find creating whiteboard lessons to be a bit easier on the app vs. the web tool. I also noticed that the web tool doesn't seem to have a keyboard input option for text like the app does. You can only write with the mouse. (The app lets you use your iOS device's keyboard to type in text on the screen.) Overall, though, things I can totally let slip for the luxury of being able to narrate and illustrate your way through a lesson and so easily make available for students... plus you can't beat the (FREE) price tag, right?
If teachers are just getting started with the idea of flipping their classroom or just want to make their own video lessons for students to help reinforce things they learn in class, EduCreations is a great tool to try and is very user-friendly. The URL of your lesson can be linked on your homework page or even emailed out to parents to help keep them in the loop, too. I definitely recommend giving it a try. You'll be hooked!
Friday, August 2, 2013
Reflection on a Summer of eLearning
 |
| The SAMR Model I created as part of my RUP |
My biggest takeaway from the eLearning coursework this summer is the SAMR Model. Having a framework to see where I am and where I need to go when it comes to technology integration was really eye-opening. I think it's just what I need to use with my colleagues to help THEM see what meaningful technology integration looks like, too. I plan to weave this in to the things I do and the professional development I provide this upcoming school year.
Because I want to introduce the SAMR Model to my colleagues this year, my Really Useful Project was a screencast I made of myself going through an introduction of the SAMR Model, and at each level, illustrating how Google Docs relates to the framework. We use Google Docs district-wide, and most staff are at least familiar with it, and many are using it or planning on using it. I thought using Google Docs to show what each level of the SAMR Model looks like would help them better visualize how to move up towards more transformational learning opportunities for students.
[Want to watch this on YouTube? Click the link here!] What's neat about the SAMR Model to me is that I realized other aspects from the course this summer, like discussions about student engagement and motivation, really goes hand-in-hand with this framework. While it may seem like a lot of work to transform the way you integrate technology and reach the higher levels of the SAMR Model, once there you're actually doing yourself a favor and making your life easier, because when students are working that that transformational level, they're engaged AND motivated, and the teacher is no longer holding their hands every step of the way in their learning. Students are driving their own learning and are getting a better idea of what the real world is like.
I appreciated the tools section; and though I feel like I curate a lot of resources and had heard of a lot of the tools presented already, I still picked up a few new ones that I plan to look into further. Hearing how others use resources, even ones I had heard about before, was helpful. I found myself pulling from discussions and things I had learned in this summer course (especially about motivation and engagement) when I presented a BYOD workshop just this week for our staff who came in for some summer professional development. I feel like having this course under my belt helped to make me feel more confident about helping others see how important it is to embrace technology in the classroom.
I'm looking forward to applying what I've learned (and keeping some things in the back of my mind as I work with others) this upcoming school year! It's going to be a great year.
Wednesday, July 24, 2013
Social Media in the Classroom

I think social media in the classroom is a great way to keep kids connected in ways they are (most likely) already using. Facebook and Twitter can be useful tools when used in meaningful ways. Facebook allows teachers and students to stay connected in groups to share information, assignments, and resources. Its forum-like abilities means that students can engage in meaningful conversation and respond to each other. Twitter can help students get and share small bites of information and follow hashtags that help network them with others discussing the same topic all over the world, including following current news and world events in real time, as they unfold.
Most students are already using Facebook and Twitter to stay up-to-date on everything else going on in their lives; having access to their classmates and teacher in an environment they're already comfortable using to continue the classroom conversation, get assignment reminders and ask questions 24/7 of other classroom members helps kids feel connected and means they are more likely to be involved and engaged in their learning. Those online conversations and interactions helps students to continue thinking about class topics even when they're not in class, and encourages them to participate anytime, anywhere.
While there are a lot of pros to the idea of using social media in education, (with students 13 or older, the minimum age to create accounts on these networks) some groundwork needs to be laid in advance and expectations covered to address the "cons." Students need to be reminded that even when at home, they still must be respectful in these online spaces with their peers, as it is an extension of the classroom environment. (This can go hand-in-hand with digital citizenship lessons!) Teachers should create a separate, professional account to use in these situations as well, instead of friending students on their personal accounts. While some may think that students will use these networks inappropriately, or that allowing them to use Facebook and Twitter in class means they will spend class time using these networks for personal reasons, it's all about setting those expectations of access and use with students ahead of time, and outlining when and what is appropriate. When you integrate the use of these social networks in meaningful ways as part of their learning, you'll find that students WANT to engage in the assignments, because they're excited to be able to use the social networks they're already comfortable using in an educational way. Most students are already learning and exploring about world events and news from others through their social networks, so it'll be a natural extension that can encourage this desire to always keep exploring and learning.
When used appropriately, social networks in the classroom can provide rich and meaningful experiences that students are comfortable with and can relate to, encouraging classroom participation and conversation even when they're not in the classroom.
Friday, July 19, 2013
Future Curation Tool to Explore: My Big Campus

Wednesday, July 10, 2013
The SAMR Model to Enhance Technology Integration
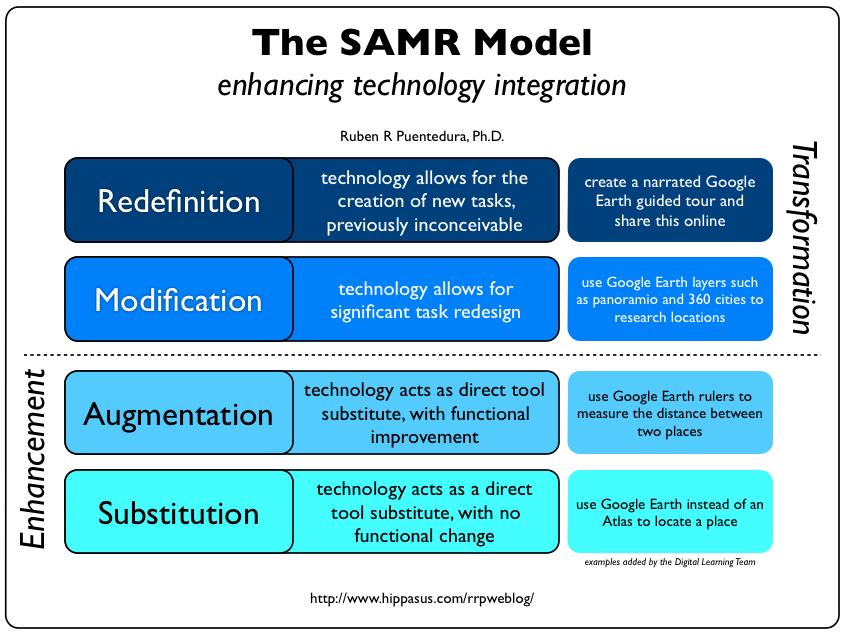
I think this brings me to the topics that have hit the closest to home for me this summer. I really think the introduction of the SAMR model is going to be most beneficial for me to start with. We have a lot of teachers who are trying technology in the classroom, and/or who are eager to get started this next year now that we've introduced BYOD, but I think too many are under the impression that this simply means using technology for technology's sake or substituting paper worksheets for worksheets that can be filled out on a handheld device. We need to move away from the substitution level and progress up the SAMR model ladder to the redefinition level, and I think the SAMR model has given me the framework I can work from to help teachers not only see this progressive ladder, but also start to climb it.
Have you seen this pedagogy wheel by Allan Carrington? It's been updated recently to include the SAMR model around the outer band of the wheel, which is so awesome and helpful! Read more about the update that helps you integrate technology at Edudemic here.

I think as teachers begin to climb the SAMR model ladder towards more transformational integration of technology, they'll find it's a natural progression into more authentic forms of assessment AND make technology integration in their classroom more engaging for students. Right now, I think teachers feel like just having devices in the classroom and using them to do substitution level tasks is motivation enough and is engaging for students. And at the start, sure! Kids will be excited just because they're allowed to use their devices. But it's not enough. The use of technology in this way just isn't meaningful, and "using technology" in classrooms like that will get stale quickly, which will lead to frustration for both teachers and students. It's going to be hard to convince teachers to let go and let students have freedom of choice... but if they use the SAMR model as a framework to build on, they'll get there. Authentic assessment and true student engagement will naturally follow suit.
I feel like I may be rambling a bit, but I think what I've just realized is that the SAMR model is going to be the backbone of how I approach working with teachers this school year. It will help teachers who have been reluctant to take their first steps have a solid starting point, and those who are ready to transition further up the ladder will see how to take their integration to the next level. The hard parts, that is, effective (and ongoing!) student engagement and authentic assessment, will naturally fall in place as the teacher works their way up to using technology in a meaningful, redefined and transformational way, because at the redefinition level students have choice, which is motivating and engaging, and their choices will make way for teachers to authentically assess them.
I'm looking forward to putting some of the things I've learned this summer into practice with staff in the fall. I can't wait to help teachers learn how to use technology in a meaningful way that will help produce students who are equipped with the skills they'll need to tackle the 21st century workplace.
Subscribe to:
Posts (Atom)