Update your bookmarks... in my previous post I indicated a new EdTech change on the horizon - I'm headed back into the classroom and will be teaching Digital Learning and Digital Video Production in the fall! I'm super excited about the upcoming school year, and in an effort to create a one-stop-shop website that includes all of my classroom information and resources for students and parents, I've moved this blog over to my new teacher website at mrskarpiuk.com. All of my previous posts from this site have been moved there now, and I will no longer continue to update this Blogger site. All new and future posts will occur at mrskarpiuk.com/blog going forward.
Hope to see you at my new website! Thanks for reading and following, and don't forget to update your bookmarks.
Mrs. Karpiuk, aka @IHeartEdTech

Sunday, July 6, 2014
Wednesday, May 28, 2014
A New EdTech Adventure

Though I was on leave, I still lurked on the #edtech and #edchat Twitter hashtags and pinned a bunch of things to save and address upon my return. And now that I've returned, a new edtech adventure is on the horizon for me; I will be teaching Digital Learning as well as Digital Video Production next school year at one of our middle schools. Though the instructional technology coaching position is going away, I am excited about the new challenges and getting to put a lot of the resources and ideas I've curated over the past four years to use in a classroom with students. Before I was an instructional technology coach I taught Computer Applications at the middle school level, so being a secondary tech teacher is familiar and something I truly enjoyed and am happy to get the opportunity to do again. Just THINK of all of the things I've learned in my current position that I now get to apply in a classroom!
It will probably be quiet again around here this summer as I enjoy time with my new baby and almost three-year-old son and start planning for next school year, but I'm looking forward to the direction this blog will go in August as I begin implementing the new digital learning curriculum. I hope to continue to share great edtech ideas for teachers, but I'll also be able to share projects that we're actually doing in class and what went well or didn't go so well. Thanks for joining me on this new adventure, and see you next school year!
Tuesday, February 4, 2014
Creative Commons Search: Find Content You Can Share, Use and Remix
 |
| Image from CreativeCommons.org |
Here's where Creative Commons comes in. Authors can choose to publish their work under a Creative Commons license to adjust copyright stipulations, which may allow the work to be shared, used, or remixed by others. From the Creative Commons website:
What is Creative Commons?
- Creative Commons is a nonprofit organization that enables the sharing and use of creativity and knowledge through free legal tools.
- Our free, easy-to-use copyright licenses provide a simple, standardized way to give the public permission to share and use your creative work — on conditions of your choice. CC licenses let you easily change your copyright terms from the default of “all rights reserved” to “some rights reserved.”
- Creative Commons licenses are not an alternative to copyright. They work alongside copyright and enable you to modify your copyright terms to best suit your needs.
Okay, so it's good to know that some people may have images out there available for you to adapt or use in education, but how do you search among images (or other works) that fall under Creative Commons in your classroom?

The CC website has a CreativeCommons.org search feature. It links to other sites' Creative Commons search services like Flickr, Google Images, and YouTube. It's a convenient way to let you search all of those other services in one place right from the CreativeCommons website instead of going to all of these places independently and doing the same search ten times. There is a disclaimer, however:
Please note that search.creativecommons.org is not a search engine, but rather offers convenient access to search services provided by other independent organizations. CC has no control over the results that are returned. Do not assume that the results displayed in this search portal are under a CC license. You should always verify that the work is actually under a CC license by following the link. Since there is no registration to use a CC license, CC has no way to determine what has and hasn't been placed under the terms of a CC license. If you are in doubt you should contact the copyright holder directly, or try to contact the site where you found the content.
Just remember to always verify the results that are returned when you search at CreativeCommons to ensure that the CC license for the work allows you to use it in the way you want to use it. (Or that it really is licensed under CC!) But this is a good starting point to find potential images that can be used safely and legally in education, and still encourages students to check ownership and correctly attribute works that they find online. It teaches the importance of not just running out and grabbing any image on Google Image search and looking closely at licenses and respecting ownership for copyrighted works.
Want to learn more about CreativeCommons? Check out their About page for a video explanation, information, and the history behind the CC movement.You can also find out how YOU can publish under a CreativeCommons license as well!
Thursday, January 23, 2014
Quickly Accessing Resources in a BYOD Classroom

The first day of bringing in devices can be a little bumpy and seem a little time consuming, but that's usually just because it's the first time students have connected to the district's wireless network and they may need help (especially in the primary grades) with this step. The good news is that going forward, their device will remember and auto-connect to the school's wireless the next time they bring it to class, so this is usually only a bump on day one that you don't have to take time to address every time.
The other piece to make BYOD successful in the classroom is quick and easy access to the resources students need for the lesson. Every second of instructional time is important, and you don't want students to waste time fumbling to find a variety of sources all over the Internet. To make it more streamlined for kids, I recommend putting together a BYOD page on your classroom website with all of the curated resources they'll need for the day in one place. Chances are, your students are well versed in getting to your classroom website, and because you can edit your BYOD resources page any time, you can edit it ahead of a lesson to make the links relevant for the day on the fly. (And house commonly used resources you want kids to have quick access to!)
But even with our students well versed in finding their teacher's classroom website, there's still the steps of going out to the web browser, searching for their school, then browsing the school website with a few clicks to finally get to your classroom webpage. So to make this one step simpler for kids, take the time to teach them how to set a bookmark directly to your BYOD resource page of your website.
Adding a bookmark in your device's browser (or directly on the "desktop" of the device, which is even faster!) will vary depending on the device you're using, but the process is fairly similar. In our district I see mostly iOS devices, with Kindles coming in second and Android coming in third... so my instructions will focus on these three devices. And depending on whether it's a phone or tablet or which model, the instructions may vary a tiny bit. Don't forget you can Google or YouTube to find specific instructions to help add a bookmark to your device's "desktop" if the below doesn't help. I promise that someone out there has documented what you need already!
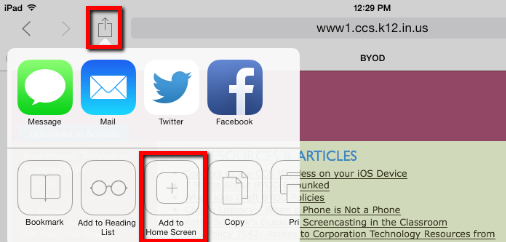 1. Go to the specific webpage you wish to bookmark in your Safari browser.
2. Click the up arrow icon next to the address bar.
3. Select the Add to Home Screen option. This will place an icon on the desktop for students amongst their app icons. (They have the option to modify its name.) It can be moved around and organized on the home screen like any other app. So simple!

1. Go to the specific webpage you wish to bookmark in your Silk browser.
2. Tap the Menu icon at the bottom of the screen and select Add Bookmark. You can modify the name of the bookmark, then tap OK to save it.
3. To access bookmarks quickly later, tap the bookmark icon at the bottom of the Silk browser screen, and bookmarks will appear for the student to choose from.
Note: The Silk browser remembers sites you access frequently, so eventually your BYOD resource website may show up on the browser's opening screen.
Android
1. Go to the specific webpage you wish to bookmark in your Chrome Android browser.
2. Tap the menu button and (depending on the browser) press the star icon to add a bookmark, or select Add to Bookmarks to do so. You can modify the name of the bookmark. Press Add.

3. The bookmark is now saved in your browser. To access your bookmarks, just press the menu button again and tap Bookmarks. When you see the bookmark listed, tap and hold the bookmark a bit to bring up an additional menu - then select Add Shortcut to Home.

I admit it will take a little time that first day or the first time you tackle helping your students bookmark your page - the first time is always that way because it may be a new process and kids may have different devices and instructions. Trust that they can help each other, too. And just think... once they've bookmarked your resources page, they will be able to access the sites they need with one or two taps in the future. In the long run this will save you so much time and totally streamline your use of devices in the classroom. It will be worth it!
Subscribe to:
Posts (Atom)