

The first day of bringing in devices can be a little bumpy and seem a little time consuming, but that's usually just because it's the first time students have connected to the district's wireless network and they may need help (especially in the primary grades) with this step. The good news is that going forward, their device will remember and auto-connect to the school's wireless the next time they bring it to class, so this is usually only a bump on day one that you don't have to take time to address every time.
The other piece to make BYOD successful in the classroom is quick and easy access to the resources students need for the lesson. Every second of instructional time is important, and you don't want students to waste time fumbling to find a variety of sources all over the Internet. To make it more streamlined for kids, I recommend putting together a BYOD page on your classroom website with all of the curated resources they'll need for the day in one place. Chances are, your students are well versed in getting to your classroom website, and because you can edit your BYOD resources page any time, you can edit it ahead of a lesson to make the links relevant for the day on the fly. (And house commonly used resources you want kids to have quick access to!)
But even with our students well versed in finding their teacher's classroom website, there's still the steps of going out to the web browser, searching for their school, then browsing the school website with a few clicks to finally get to your classroom webpage. So to make this one step simpler for kids, take the time to teach them how to set a bookmark directly to your BYOD resource page of your website.
Adding a bookmark in your device's browser (or directly on the "desktop" of the device, which is even faster!) will vary depending on the device you're using, but the process is fairly similar. In our district I see mostly iOS devices, with Kindles coming in second and Android coming in third... so my instructions will focus on these three devices. And depending on whether it's a phone or tablet or which model, the instructions may vary a tiny bit. Don't forget you can Google or YouTube to find specific instructions to help add a bookmark to your device's "desktop" if the below doesn't help. I promise that someone out there has documented what you need already!
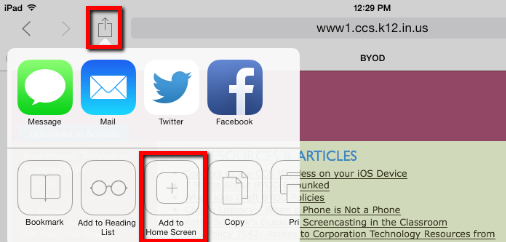 1. Go to the specific webpage you wish to bookmark in your Safari browser.
2. Click the up arrow icon next to the address bar.
3. Select the Add to Home Screen option. This will place an icon on the desktop for students amongst their app icons. (They have the option to modify its name.) It can be moved around and organized on the home screen like any other app. So simple!

1. Go to the specific webpage you wish to bookmark in your Silk browser.
2. Tap the Menu icon at the bottom of the screen and select Add Bookmark. You can modify the name of the bookmark, then tap OK to save it.
3. To access bookmarks quickly later, tap the bookmark icon at the bottom of the Silk browser screen, and bookmarks will appear for the student to choose from.
Note: The Silk browser remembers sites you access frequently, so eventually your BYOD resource website may show up on the browser's opening screen.
Android
1. Go to the specific webpage you wish to bookmark in your Chrome Android browser.
2. Tap the menu button and (depending on the browser) press the star icon to add a bookmark, or select Add to Bookmarks to do so. You can modify the name of the bookmark. Press Add.

3. The bookmark is now saved in your browser. To access your bookmarks, just press the menu button again and tap Bookmarks. When you see the bookmark listed, tap and hold the bookmark a bit to bring up an additional menu - then select Add Shortcut to Home.

I admit it will take a little time that first day or the first time you tackle helping your students bookmark your page - the first time is always that way because it may be a new process and kids may have different devices and instructions. Trust that they can help each other, too. And just think... once they've bookmarked your resources page, they will be able to access the sites they need with one or two taps in the future. In the long run this will save you so much time and totally streamline your use of devices in the classroom. It will be worth it!